Introduction to ClickUp for Enhanced Productivity
As a neurodiverse business owner, leveraging the capabilities of a project management tool like ClickUp is essential. While its myriad of features can initially seem daunting, mastering ClickUp can significantly streamline your workflow. By adopting the tips and strategies I’ve honed as a neurodiverse Verified+ ClickUp Consultant, you can craft a productive space that caters to your unique cognitive style using these ClickUp tips and tricks.
Centralize Your Tasks with ClickUp
ClickUp serves as an all-in-one hub for your business activities and personal tasks. Rather than juggling responsibilities across emails, Slack, texts, or other platforms like Trello, consolidating them within ClickUp ensures easy access and organization. ClickUp also automates reminders for critical obligations (such as quarterly tax payments) allowing you to focus on what matters most without the fear of forgetting.
Streamlining Your ClickUp Experience
Simplify Your Setup
To maximize ClickUp’s efficiency, maintain a minimalist approach to your setup:
- Avoid Common Setup Mistakes: One frequent error is creating separate spaces for each client. This is not necessary for more small business or online business owners. Instead, start with just two spaces: one for internal business tasks (“Business Headquarters”) and another for client-related tasks (“Client Management”). You can later add in additional spaces as necessary.
- Optimize Your Spaces: Within “Business Headquarters”, create folders for different departments like marketing and sales, but keep it to a minimum. Use the “Client Management” space to organize client-specific folders – one per client.
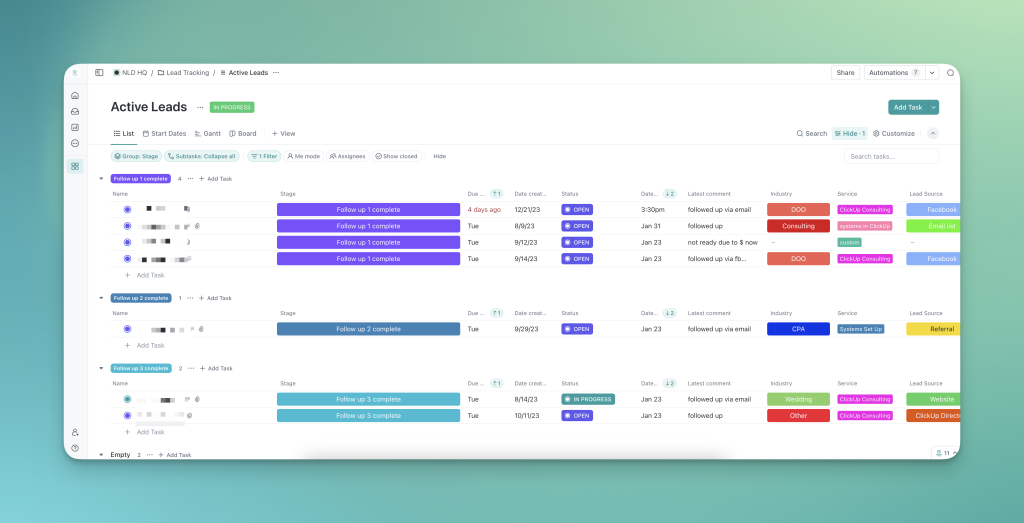
Organize with Lists and Custom Fields
Employ lists and custom fields to organize work efficiently. For instance, my lead tracking system uses lists sorted with custom fields to manage lead information effectively.
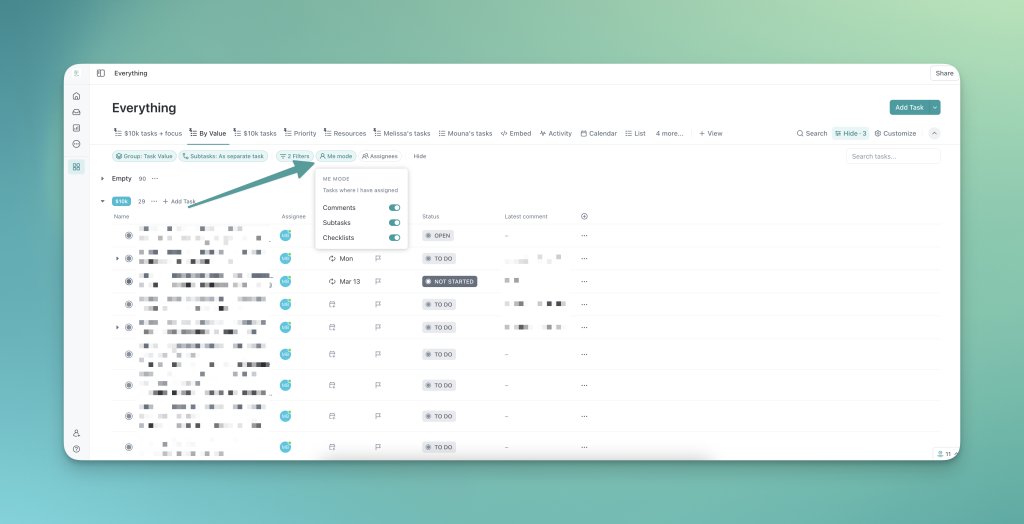
Embrace ‘Me Mode’
For those who operate on an “if I can’t see it, it’s dead to me” basis, especially those with ADHD, ‘Me Mode’ is invaluable. It filters out all other workspace activities, showing only tasks, comments, and items specifically assigned to you. You probably don’t need to see Clara the VA’s social media scheduling tasks to get your work done.
Save yourself from the potential distraction and rabbit holes by keeping Me Mode on as much as you can:
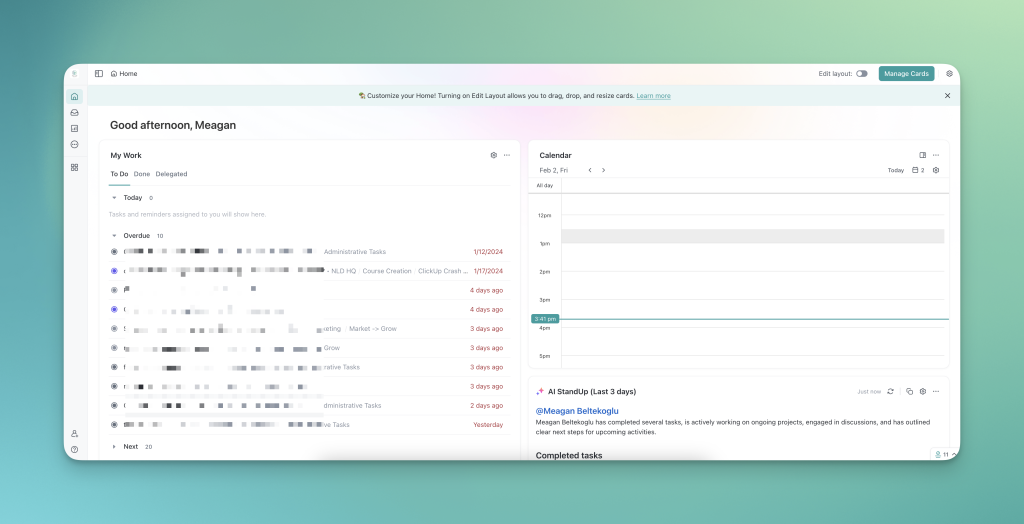
Use ClickUp’s Home Feature
ClickUp’s Home feature is particularly beneficial for neurodiverse users. It displays only the tasks you need to address today, minimizing distractions. Noteworthy tools within Home include ClickUp AI StandUp™ where you can see what people are working on using data from tasks instantly with AI and My Work for a clear daily action list.
Discover the Perfect View for Your Brain
ClickUp’s diverse range of views caters to different thinking styles:
- Linear Thinkers: List or table views may be preferable.
- Visual Thinkers: Board or whiteboard views can be more engaging.
- Spreadsheet Enthusiasts: Table view will be right up your alley.
- Strategic Planners: Box or timeline views provide a broader perspective.
The option to duplicate views in different formats further personalizes the experience to suit various preferences and different types of thinkers and brains.
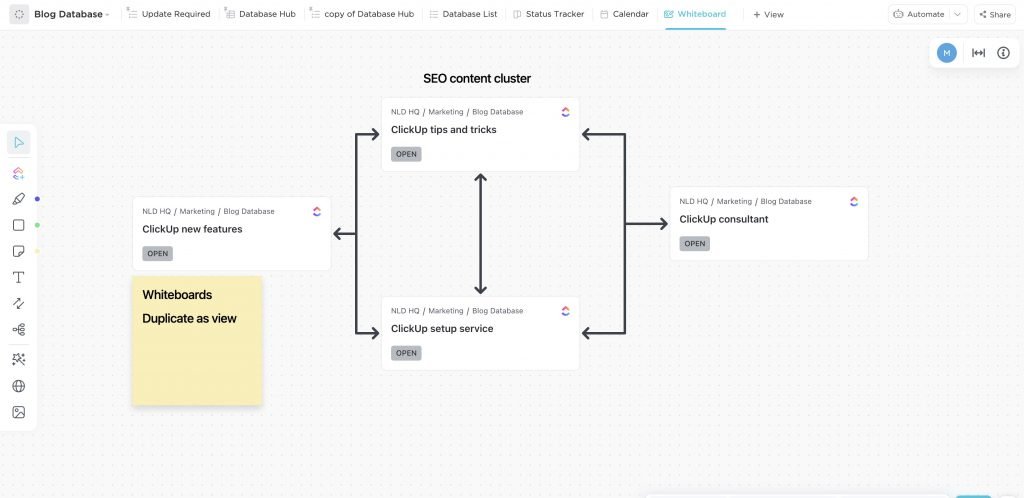
Visualize Ideas with ClickUp Whiteboards
For creative brainstorming and tracking, ClickUp whiteboards are excellent for visualizing connections and organizing thoughts alongside actual tasks, as you can see in this example of connections I made between different tasks:
Advanced ClickUp Features for Enhanced Control
Utilize Saved Views
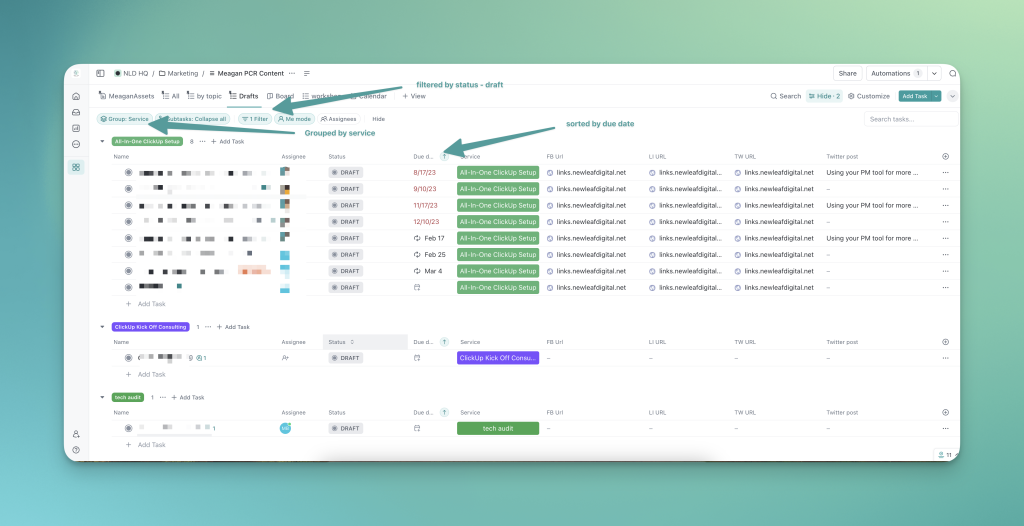
As your workload expands, customize saved views to focus on specific tasks while hiding unnecessary information. You can establish these at any level in ClickUp’s hierarchy based on your preferences. Custom saved views, which help prevent overwhelm, are created by adding a new view and adding filters, grouping, sorting, and customizing which columns are visible.
Here’s an example of a saved view in my content calendar:
Prioritize with Favorites
Mark frequently accessed lists and views as favorites for quick retrieval. Ensure your favorites bar is pinned for ease of access.
Manage Notifications Intelligently
The first thing I have my ClickUp setup clients do is turn off their notifications. Optimize your notification settings by disabling unnecessary alerts while keeping critical ones like @ mentions active.
Implement the Task Tray
To avoid the whole “what task what I was just working on???” thing, make use of the task tray ClickUp feature. The task tray feature helps maintain focus by minimizing tasks instead of closing them, keeping your current work accessible and ordered by priority.
If you’re working on a task and need to open another one, check a dashboard, or review a doc, instead of closing it and hoping you find it again and don’t get distracted on your way back, minimize the task into the task tray.
Keep your task tray pinned so that it’s always visible to you – you need to have the tasks you were working on easily accessible.
Assemble a Business Hub
The average person spends over 5 hours a week looking for stuff on their computer. To prevent this waste of time (and money!), create a Business Hub List with all your important stuff: your branding info, your bio, anything you find yourself looking for over and over.
Simplify and organize your business with the ClickUp Business Hub Template
Delegate Your ClickUp Setup for Optimal Results
Considering the complexity and potential time and financial investment in setting up ClickUp, consider enlisting the expertise of a neurodiverse-friendly Verified+ ClickUp Consultant. Not only can I tailor the platform to your needs, but I can also provide personalized training to enhance your proficiency. Learn more about my setup service.
Transform Your Workflow with Expert ClickUp Consulting
Don’t let the intricacies of ClickUp overwhelm you. As a specialized consultant with a focus on women-owned online businesses, I offer comprehensive setup and optimization services to help you harness the full potential of ClickUp. Ready to revolutionize your project management approach? Get started today!